Ein solides File Management ist der erste Schritt zu guter Datenqualität im Datawarehouse. Wie kann man File Management im Modern Datawarehouse realisieren? Ein Ansatz sind die Azure Datafactory und Azure Databricks. Azure Functions bieten hier eine gute Alternative. Bevor ich euch die Lösung zeige, will ich das Problem noch etwas eingrenzen.

File Management

Häufig müssen verschiedenste Arten von Dateien in ein Datawarehouse importiert werden.
CSV-Dateien sind bei großen Datenvolumen, im Vergleich zu HTTP-Schnittstellen, schnell exportiert und schnell importiert.
XLSX-Dateien sind üblich, wenn es eine Schnittstelle mit einem manuellen Prozess gibt und ein Anwender Daten in Excel bearbeitet.
XML-Dateien erlauben den Austausch von komplexen Datenstrukturen zwischen Systemen.
Ein bewährtes Vorgehen ist für Schnittstellen-Dateien Metadaten zu erfassen, etwa wann eine Datei registriert und geladen wurde. Gleichzeitig sollten diese Dateien archiviert werden. Manchmal müssen die Dateien noch konvertiert werden.

Das Modern Datawarehouse

Realisiert man klassische Datawarehouse-Architekturen in der Cloud führt kaum ein Weg an Infrastructure as a Service vorbei. Das größte Potenzial bietet die Cloud aber bei Platform as a Service, da im Leerlauf weniger Ressourcen verbraucht werden und damit Kosten sinken können.
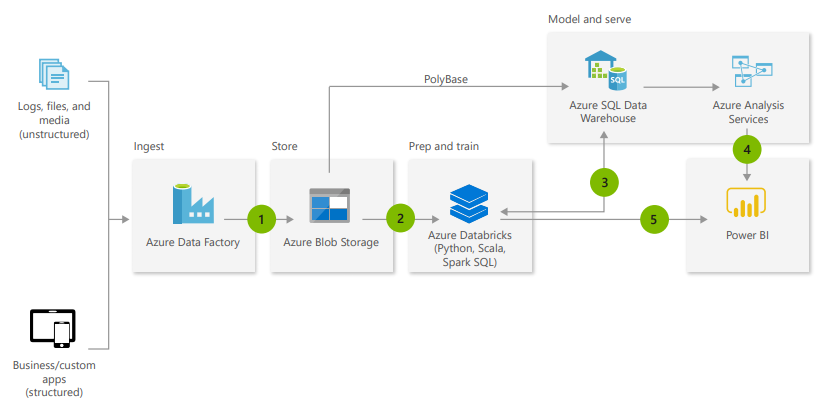
Eine Datawarehouse-Architektur die auf Platform as a Service realisiert werden kann ist das von Microsoft vorgeschlagene Modern Datawarehouse

Das sieht folgendermaßen aus:
Modern Datawarehouse Diagramm

Azure Functions

Azure Functions sind zustandslose Webservices, die auf unterschiedlichste Ereignisse registriert werden können und dann eine bestimmte Aufgabe erledigen sollen. Ereignisse können Zeitpläne, HTTP-Requests oder Änderungen in einem Azure Blob-Store sein. Kosten entstehen pro Aktivierung einer Funktion und skalieren so gut mit der entstandenen Last.

Azure Functions

Problemstellung und Lösungsansatz

Die Datenhaltung im Modern Datawarehouse ist keine Relationale Datenbank sondern ein Data Lake. Ein Data Lake ist im Kern ein Dateisystem.
Die Datenintegration legt Dateien im Lake ab und Konsumenten lesen die Dateien. Dabei ist essentiell, dass die Daten geordnet abgelegt werden. Nach Möglichkeit müssen die Daten partitioniert werden, sodass bei Zugriffen nicht alle Dateien durchsucht werden müssen.

Welche Komponente übernimmt jetzt das File Management? Eigentlich müsste die Azure Data Factory diesen Aspekt abdecken. Ist aber noch recht limitiert und eignet sich eher für simples Data Movement. Alternativ kann das File Management in Databricks implementiert werden.
Azure Functions sind hier aber preislich günstiger und nicht weniger leistungsfähig.

Rechnet man mit wenigen hundert Dateien, die pro Tag verarbeitet werden wird man das Gratisvolumen von 1 Mio. Zugriffen kaum ausschöpfen.
Ein anderer Vorteil gegenüber der Azure Data Factory ist, dass man hier vollwertige Programmiersprachen wie C# oder Python verwenden kann. Mit Konzepten wie Vererbung kann ein großer Teil des Codes wiederverwendet werden und muss pro Datei-Typ nur sehr wenig Code zusätzlich geschrieben werden.

Design

Das Design ist simpel. Es gibt drei Azure Storage Accounts. Einen für den Input, einen für das Archiv und einen für den Data Lake. Im Input und im Archive existiert jeweils für jeden Dateityp ein Blob Container. Im Lake Storage gibt es nur einen gemeinsamen Container.
Jetzt wird eine Datei im Input abgelegt. In meinem Beispiel ist das ein Microsoft Flow, der einen Anhang aus einer E-Mail mit einem speziellen Betreff ablegt. Das könnte aber genauso ein AzCopy-Aufruf von einem Dienstleister sein.
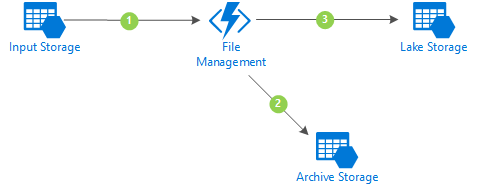
Eine Azure Function ist auf neue Dateien im Input Blob Container registriert und wird aktiviert (Punkt 1 in der folgenden Grafik).
Die Function erzeugt ein Verzeichnis im Archiv Container mit dem aktuellen Zeitstempel und kopiert die Datei unbearbeitet in das neue Verzeichnis. Damit können keine Dateien überschrieben werden oder verloren gehen (Schritt 2).
Im Lake Container gibt es jeweils je Dateityp ein Verzeichnis.
Die Function vergibt der Datei einen neuen eindeutigen Namen, konvertiert bei Bedarf den Zeichensatz und legt die Datei im Lake Storage ab.
Dazu werden noch die Metadaten als eigener Dateityp abgelegt, die bei Analysen verknüpft werden können (Schritt 3). Zuletzt wird noch die Datei aus dem Input gelöscht.

File Management - Flow

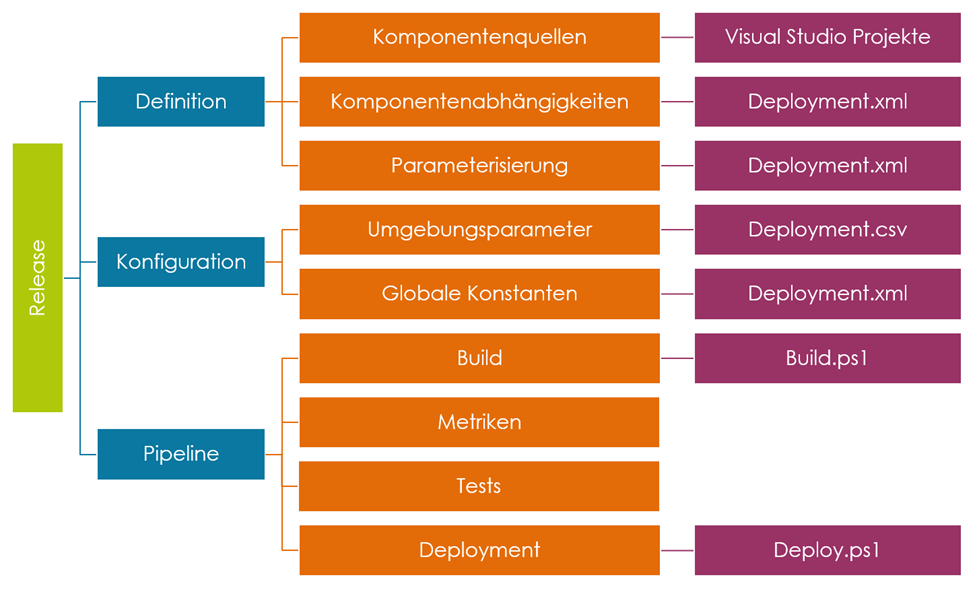
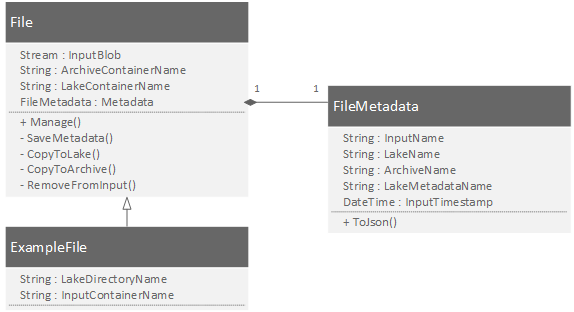
Die Struktur der Function ist in der folgenden Grafik gezeigt. Die gesamte Logik liegt in der File-Klasse und ist damit wiederverwendbar. In der spezifischen Klasse wird nur festgelegt in welchem Container der Input liegt und in welchem Verzeichnis die Daten im Lake abgelegt werden sollen. Die Metadaten werden als eigene einheitliche Klasse realisiert und können so leicht serialisiert und im Lake abgelegt werden.

File Management - Structure

Demo

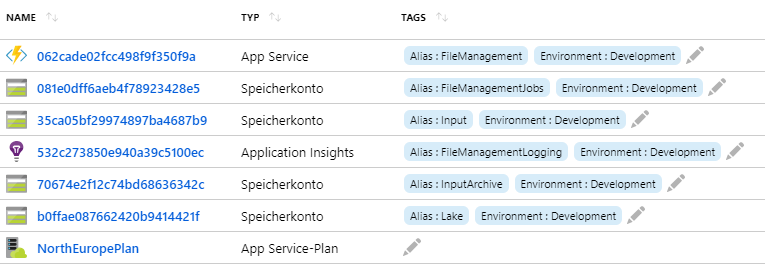
Für die Demo habe ich eine DEV-Umgebung in Azure erzeugt. Zusätzlich zu den erklärten Services benötigen die Azure Functions noch einen weiteren Storage Account und einen App Service Plan. Dazu werden noch die Application Insights verwendet um die Lösung zu überwachen.

Ressource Group

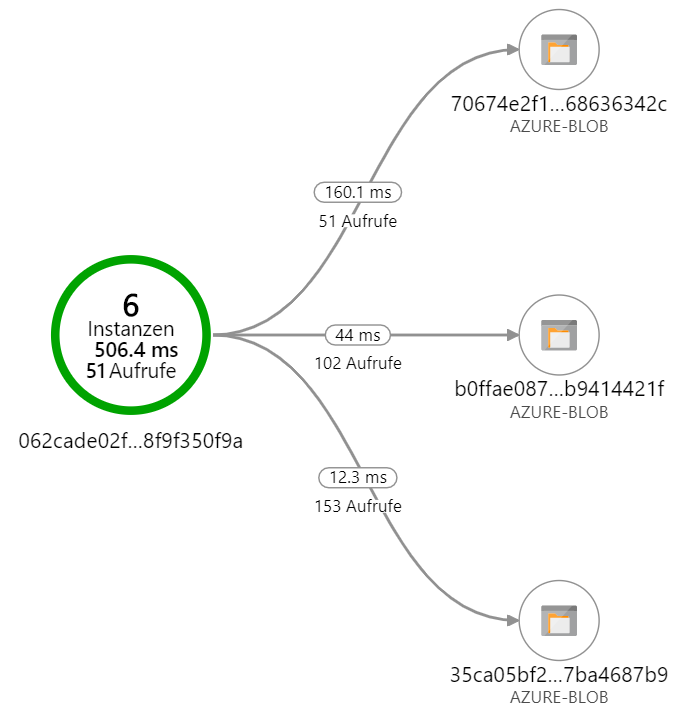
Die Application Insights zeigen auch, dass die Lösung tatsächlich läuft.

Application Insights

Im Storage Explorer kann man dann sehen, wie die Dateien im Lake abgelegt werden. Für jede Input-Datei wurde über eine GUID identifizierbar der Inhalt als CSV und die Metadaten als JSON abgelegt.

Lake - files
Lake - zep

Wie funktioniert Automatisches Deployment von Datawarehouse-Systemen? Im Rahmen von Projekten mit DevOps-Ansatz spielen Continuous Integration und Continuous Deployment eine wichtige Rolle für ein effizientes Arbeiten. Der erste Schritt zu Continuous Deplyoment ist die Deployment-Automatisierung. Das ist bei Datawarehouse-Systemen nicht anders. Eine Anforderung dazu ist die Versionsverwaltung der Quellen. Jede Version kann automatisch in ein Release übersetzt werden. Das umfasst das Erstellen einer Installationsdatei aus den Quellen. Das Deployment ist dann das Aktualisieren einer Systemumgebung (Produktionssystem oder Testsystem). Das vereinfacht insbesondere die Qualitätssicherung, was in Folge auch die Änderbarkeit des Systems verbessert und letztendlich die Qualität an sich erhöht.

CI and CD

Systemdefinition und Versionierung

Bei SQL Server-basierten Datawarehouse-Systemen besteht die Systemdefinition aus Visual Studio Projekten. Für SQL-Datenbanken, Integration Services, Reporting Services und Analysis Services gibt es jeweils Visual Studio Projekttypen. Das ist aber noch nicht ausreichend für das automatische Deployment von ganzen Lösungen. Es fehlen Projekte für SQL Server Agent Jobs und Linked Server. Integration Services Pakete verwenden häufig PowerShell-Skripte für File-Management und Dummy-Dateien für die Validierung der Pakete. Dafür gibt es ebenfalls keine Standardlösung. Reporting Services Projekte unterstützen keine Report Abonnements mit Data-Driven-Subscriptions, die häufig für automatische Exporte von XLSX- oder PDF-Dateien verwendet werden. Ein weiters Problem dieser Projekttypen ist, dass es keine geeignete Möglichkeit gibt um zu definieren, wie diese Projekte zusammenhängen, sodass eine vollständige Lösung deployt werden können und dabei die zielumgebungsspezifischen Reports mit Datenbanken, ETL-Prozessen verknüpft werden können.
Diese Mängel müssen mit zusätzlichen Skripten und Konfigurationsdateien kompensiert werden. Ein Build-Skript erzeugt ein Release-Archiv mit allen Dateien, die für das Deployment nötig sind. Ein Deployment-Skript verwendet das Release-Archiv und den Namen der Zielumgebung als Parameter. Eine Deployment-Konfiguration enthält die Informationen zur Verknüpfung der Komponenten. Eine Umgebungs-Konfiguration enthält die umgebungsspezifischen Parameter wie Hostnamen und Benutzernamen.

DWH Release

Implementierung

Es gibt diverse Möglichkeiten diesen Ansatz zu implementieren. Bewährt haben sich XML-Dateien für hierarchische Konfigurationen, wegen guter Lesbarkeit und Unterstützung von internen Variablen, die z.B. JSON nicht unterstützt. Tabellarische Konfigurationen wie z.B. umgebungsspezifische Parameter können gut in CSV-Dateien abgelegt werden, da diese einfach verarbeitet werden können und leicht in Excel gepflegt werden können.
Die Build- und Deployment-Schritte können effizient in PowerShell implementiert werden. Grafische Werkzeuge wie Microsoft Azure Pipelines, CA Application Release Automation sind für kleinteilige Deployment-Schritte sehr umständlich und eignen sich maximal zur Ausführung von Deployment-Skripten.

Recently, I attend the JavaScript Days 2019 where I participated in two awesome workshops (TypeScript Deep-Dive and Advanced black magic in TypeScript) dealing with advanced TypeScript features. Within this blog post I want to share some of the findings and aha moments I had during these sessions.
Note that these learnings are very personal, not necessarily interrelated and often quite opinionated. I hope that you can nevertheless profit from my experiences. If you have any questions or want to discuss some of the more controversial topics, please leave a comment down below.

Contents

  • Where to and where not to add types
  • How to think about function signatures
  • Enums vs. Const Enums vs. Union Types
  • Immutability in TypeScript

Where to and where not to add types

Let’s start of with a pretty fundamental question: at which places should you add types to your plain JavaScript? As we all know, TypeScript allows us to type variables and function signatures. Furthermore, there is the possibility to write "OOP-style" TypeScript using well-known constructs like classes and interfaces together with concepts like inheritance and polymorphism.
Let’s suppose we want to start using TypeScript in our existing JavaScript project. Where should we start using types?
First of all, I would highly recommend that you turn on the compiler option noImplicitAny in your .tsconfig. According to the comment in the boilerplate .tsconfig, this option

raise[s] [an] error on expressions and declarations with an implied ‘any’ type.

Of course, the thing we as TypeScript developers hate the most is the any type. Once we come across e.g. a local variable of type any, we will not get any further information about it and autocompletion or refactoring features don’t work – we are basically back to the stone age of plain JavaScript. With the noImplicitAny option turned on, the compiler so to speak warns us where type inference fails to do its job and points us directly to the places in our code where we need to add types.
When googling something like "TypeScript tutorial", nearly every introduction starts by explaining the syntax for typing a variable. You usually encounter something like this:

let message: string = "Hello World";

One of the very few exceptions to this rule is the official quickstart from the TypeScript team itself – it seems like they know what they are doing 😉
I would suggest: don’t annotate your variables with types. You don’t need to. Instead, use the powerful builtin type inference to your advantage. This is trivial for primitive types like in the example above.

let message = "Hello World";

This is semantically exactly the same as the previous line, since TypeScript infers that the variable message is of type string.
So don’t type variables explicitly, but rather type function parameters and return values and use some of the OOP constructs if required. However, there is one exception to this rule: Literal types.
I makes sense to type these explicitly if you don’t want type widening to happen.

How to think about function signatures

Consider the following example:

interface Address {
  street: string;
  city: string;
}

interface Customer {
  name: string;
  dateOfBirth: Date;
  addresses: Address[];
}

function getAddressesByCity(city: string, customer: Customer) {
  return customer.addresses.filter(address => address.city === city);
}

Since we initially plan to call the function getAllAddressesByCity in the context of a customer, we require the function to always take a customer as an input. However, the function really doesn’t operate on a customer, but rather on an Address array. Think about the plain JavaScript which the TypeScript compiler emits. It looks like this:

function getAllAddressesInCity(city, customer) {
  return customer.addresses.filter(function(address) {
    return address.city === city;
  });
}

Since none of the TypeScript types exist at run time, the compiled function doesn’t care at all if the object we pass it is really a customer or if it is something completely different as long as it has an array of objects each containing at least a city property. So why don’t we generalize our initial implementation of the getAllAddressesByCity function a bit.

function getAllAddressesInCity<T extends { addresses: Customer["addresses"] }>(
  city: string,
  input: T
) {
  return input.addresses.filter(address => address.city === city);
}

Not limiting the inputs artificially, but rather describing what the function could in principle do, results in two distinct advantages. Of course, this style of coding leads to more reusability throughout your code base. E.g. we could easily use getAllAddressesByCity for vendors as well (assuming that they can indeed have multiple addresses).
The second benefit arises when it comes to testing our new function. Using our initial implementation we would have to mock a whole Customer object, even if the only thing we really need is an array of Addresses. With our more general implementation we can work with much smaller and therefore more manageable mocks. However, this second advantage becomes less important, when using a mocking framework like typemoq.
So in a nutshell, describe functions in terms of what they CAN do, instead of what they SHOULD do. This makes functions more reusable and mocking much easier.

Enums vs. Const Enums vs. Union Types

Chances are you are using enums or const enums to organize a collection of related values you use throughout your codebase. If so, consider replacing your enums with union types. The following table compares enums, const enums and union types.

Type Runtime Artifact Opaque
enum number Yes No
const enum number No No
string enum string Yes Yes
const string enum string No Yes
literal union type arbitrary No No

As you can see, one big advantage of literal union types is, that you can use them with arbitrary types (e.g. with object literals). Additionally they don’t have a runtime artifact, which saves precious bundle size when developing frontends. The fact that they are not opaque means that you can e.g. directly assign the literal string "Country" to a variable of type GenreUnion – if using a (const) string enum, you would have to write GenreEnum.Country instead:

enum GenreEnum {
  Country = "Country",
  Western = "Western"
}
type GenreUnion = "Country" | "Western";

let westernFromEnum: GenreEnum = "Western"; //Type '"Western"' is not assignable to type 'GenreEnum'.
let westernFromUnion: GenreUnion = "Western";

Note that if using a modern code editor like VS Code, you don’t have to worry about fat-fingering the strings – you get autocompletion for them, and even if a typo does happen, you get an immediate compiler error.

Of course, there are some edge cases where you might need to use regular enums (e.g. you can’t iterate over union types), but most of the time, literal union types work just as well and provide the discussed advantages.

Immutability in TypeScript

Let’s suppose we want an Address object to be immutable. The first thing which comes to mind could be to use the const keyword for local variables like this:

const address = {
  street: "Elsenheimerstraße 53",
  city: "Munich"
};

address.city = "Chicago"; // Mutation of object properties is possible.

However, according to the specification,

[const] are like let declarations but, as their name implies, their value cannot be changed once they are bound. In other words, they have the same scoping rules as let, but you can’t re-assign to them.

So the const keyword does not help us with creating an immutable object, it merely prevents us from reassigning another object to the address object.
A viable approach for making an object immutable would be to mark all its properties as readonly like this:

interface Address {
  readonly street: string;
  readonly city: string;
}

const address: Address = {
  street: "Elsenheimerstraße 53",
  city: "Munich"
};

address.city = "Chicago"; // Cannot assign to 'city' because it is a read-only property.

If you don’t want your Addresses to be immutable always, a cleaner solution would be to use the built-in utility type Readonly, so that you don’t have to create a whole new interface (or class or type):

interface Address {
  street: string;
  city: string;
}

const address: Readonly<Address> = {
  street: "Elsenheimerstraße 53",
  city: "Munich"
};

address.city = "Chicago"; // Cannot assign to 'city' because it is a read-only property.

Starting with TypeScript 3.4 there is a third option for achieving immutability for objects: const assertions.

// Type '{ readonly street: "Elsenheimerstraße 53", readonly city: "Munich" }'
const address = {
  street: "Elsenheimerstraße 53",
  city: "Munich"
} as const;

address.city = "Chicago"; // Cannot assign to 'city' because it is a read-only property.

Note that additionally the type of address is now extremely specific, since no type widening (e.g. no going from "Munich" to string) takes place.

Take-aways

  • Take advantage of the powerful type inference and only type variables explicitly if really necessary
  • Describe functions in terms of what they can do, instead of what they should do
  • Use literal union types instead of enums
  • const is not enough for creating an immutable object