Building bridges is hard
In a world where everybody builds distributed system (in a small scale: for microservice-based systems; in a larger scale for a global market) and time to market is a key success factor, we face the challenges of parallel development and synchronization across teams and products. While agile frameworks like SCRUM address some of the arising topics (e.g. having a unifying definition of done for multiple teams) there are other means to tackle the complexity.
But before we jump to a solution, let’s take one step back and review one of the typical issues:
- One team or company builds an awesome API and another team integrates it into their product.
- The second team must wait for team one to have a working API before they can start their integration work. However, even after they waited for team one to finish, they face mayor problems during their development.
These could occur while working with the API directly but might as well be totally unrelated (e.g. when trying to automate an unclear business process). The reasons don’t matter that much when the second team’s product arrives the market too late and lost its worth.
We (i.e. software engineers) solved these kinds of problems on other layers already. When building a database-heavy application we start with the data model (+ database) and then build the user-facing application and the data-oriented pipelines, optimizations etc. in parallel – instead of sequential development. We call this database first.
Series:
- API First with Zalando, Python and OpenAPI (Building Bridges Part I)
- Python microservices with Docker, Kubernetes & Azure (Building Bridges Part II)
- Part III (coming soonTM)
So, let’s talk about API first…
The idea is not complicated: two (or more) teams design an interface collaboratively. Usually, this is achieved by a proposal from one team and following discussions. The result should be an interface description that all parties agree on. In our case we are going to use the OpenAPI specification (or swagger if you don’t look too closely). We can create an example for our case here: here or here.
Disclaimer: There a lot of pay-versions out there, but these two are free and without registration. So, they are either nice or steal your data.
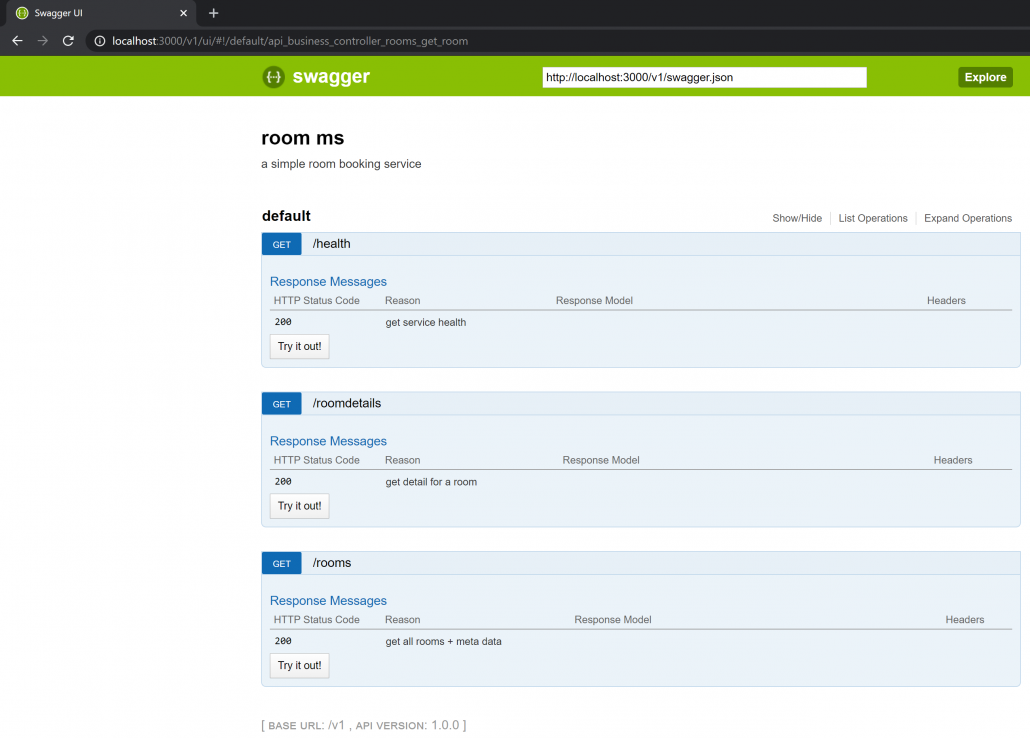
For the example in this post we want to create an API used for a room-booking service (think about it like the outlook room booking feature for meetings). We’ll start with two endpoints
GET /roomsgives a list of all available rooms andGET /roomdetailsprovides more specific information for a given room
For good measure we throw in a technical service endpoint with
GET /healththat provides a simple ‘ok’ in case our service is up and running.
Using one of the API designers and only minimal features of OpenAPI we end up with our swagger.yml:
swagger: "2.0"
info:
  description: 'a simple room booking service'
  version: 1.0.0
  title: room booking service

basePath: /v1

schemes:
  - http
consumes:
  - application/json
produces:
  - application/json

paths:
  /health:
    get:
      operationId: ''
      responses:
        '200':
          description: 'get service health'
  /rooms:
    get:
      operationId: ''
      responses:
        '200':
          description: 'get all rooms + meta data'
  /roomdetails:
    get:
      operationId: ''
      responses:
        '200':
          description: 'get details for a room'
Before we implement our (mock) API, we create our webservice with these six lines of code (app.py):
import connexion

app = connexion.App(__name__,
                    options={"swagger_ui": True})
app.add_api('swagger.yaml')
application = app.app

if __name__ == '__main__':
    app.run(port=3000, server='gevent')
Before we explore what we see here, we’ll install our dependencies first. There are multiple ways to do this in python, but for the easy way we use pip and our requirements.txt. For people unfamiliar with python, this would be like npm & package.json for Nodejs or maven & the pom.xml in Java.
connexion[swagger-ui]
gevent
Connexton is an API-first framework build in python by Zalando (Open Source). It leverages popular technology components like Flask and Oauth2 and integrates various industry standards to fasten up (microservice) development.
Gevent is a python networking library that is used as a WSGI server in this case. For our purpose we do not need more information on this, but if you want to dig deeper, check out this excellent blogpost.
Now, let’s come back to our code! As you can see, we create a new connextion.App(...) with enabled swagger ui and add an API (reference) the app exposes (our previously created swagger.yaml). We are pretty close to running our API-first application.
Connecting the dots
For the last steps, we need a mock implementation of your endpoints. In a real-world example, you should have defined responses in you swagger specification already. A variety of tools can generate server mocks from this. However, as we have a slim example, we create this without any tooling help.
Considering our current project structure, we’ll just add two files for our API-controllers. We create an api/ folder with two subfolders for our "business" logic and our technical health-endpoint (rooms.py and health.py):
app.py
requirements.txt
swagger.yml
api
|-- business_controller
|   `--rooms.py
|-- tech_controller
    `-- health.py
Simple mock-returns for rooms.py and health.py:
def get_room():
    return ["Kallista", "Io"]

def get_room_details():
    return [{"name": "Kallista", "space": 3},{"name": "Io", "space": 4}]
def get():
return 'ok'Ok, let’s review what we got so far…
- We have an API specification (at this point another team could start their work).
- We created a lean python webserver that exposes our API from our specification.
- Lastly, to actually run this, we coded a trivial stub implementation of our API.
The last thing we need to do is to connect our API routes to our controller functions. This is easily done by enhancing our swagger.yaml slightly (adding the path to our controllers as operationId):
swagger: "2.0"

info:
  description: 'a simple room booking service'
  version: 1.0.0
  title: room ms

basePath: /v1

schemes:
  - http
consumes:
  - application/json
produces:
  - application/json

paths:
  /health:
    get:
      operationId: api.tech_controller.health.get
      responses:
        '200':
          description: 'get service health'
  /rooms:
    get:
      operationId: api.business_controller.rooms.get_room
      responses:
        '200':
          description: 'get all rooms + meta data'
  /roomdetails:
    get:
      operationId: api.business_controller.rooms.get_room_details
      responses:
        '200':
          description: 'get detail for a room'
Explore and verify our API first mock service
Now let’s enjoy our service:
~/DEV/wellroom-room$ pip3 install -r requirements.txt
~/DEV/wellroom-room$ python3 app.py
We could call our API now at http://localhost:3000/v1/health or http://localhost:3000/v1/rooms with a tool like Postman or Insomnia, but we can also serve to http://localhost:3000/v1/ui/ and explore the API via the build-in swagger-ui function in a browser.
Wrap up and what we didn’t cover
We learned about the benefits of API first and saw one way to approach the topic. We got a short glimpse at what python with connexion can do for us. From tooling standpoint, we saw tools to create OpenAPI specifications.
The two main things we are missing at this point is the security component and quality assurance (e.g. testing + linting). The first part is a topic on its own, but one of the great benefits of using connexion is the native integration of standard mechanisms like Oauth2 and X-API-KEYs. For testing and linting there are great blogs, books and videos out there….😉
Follow up
This blogpost is part of a series.
-
The next post is going to focus on how to integrate such a microservice in an enterprise ecosystem:
- Dockerize the application,
- use Azure Container Registry to store our application,
- create and access an Azure Kubernetes Service and finally
- deploy our service in this Kubernetes cluster.
-
The third post shows how to enforce improvement with continuous delivery and/or continuous deployment for our room service:
- leverage AzureDevOp’s Build and Release Pipelines for our service and
- integrate our Kubernetes cluster as environments in AzureDevOps.