
About
When it comes to Mobile App Development, there are basically two approaches you can adopt to get on track. You can either go for native development with Swift for iOS and/or Java/Kotlin for Android, or for a cross-platform solution. Cross-platform solutions allow for writing a single code base while being able to deploy the application on several target operating systems. Cross-platform solutions comprise the two approaches truly native and hybrid development.
This article classifies the different approaches before going into detail with NativeScript – a framework which allows for writing native applications entirely with web technologies, e.g. JavaScript/TypeScript and Angular.
Hybrid vs. Truly Native – Getting things sorted out
In the context of cross-platform mobile development, you might have heard of Apache Cordova and Ionic, PhoneGap, Xamarin or NativeScript. In the end, all of the approaches mentioned are cross-platform, and generate apps for multiple mobile platforms from one and the same code base. However, there are some differences between the approaches.
In general, a distinction is made between hybrid apps and truly native apps.
Hybrid Approach
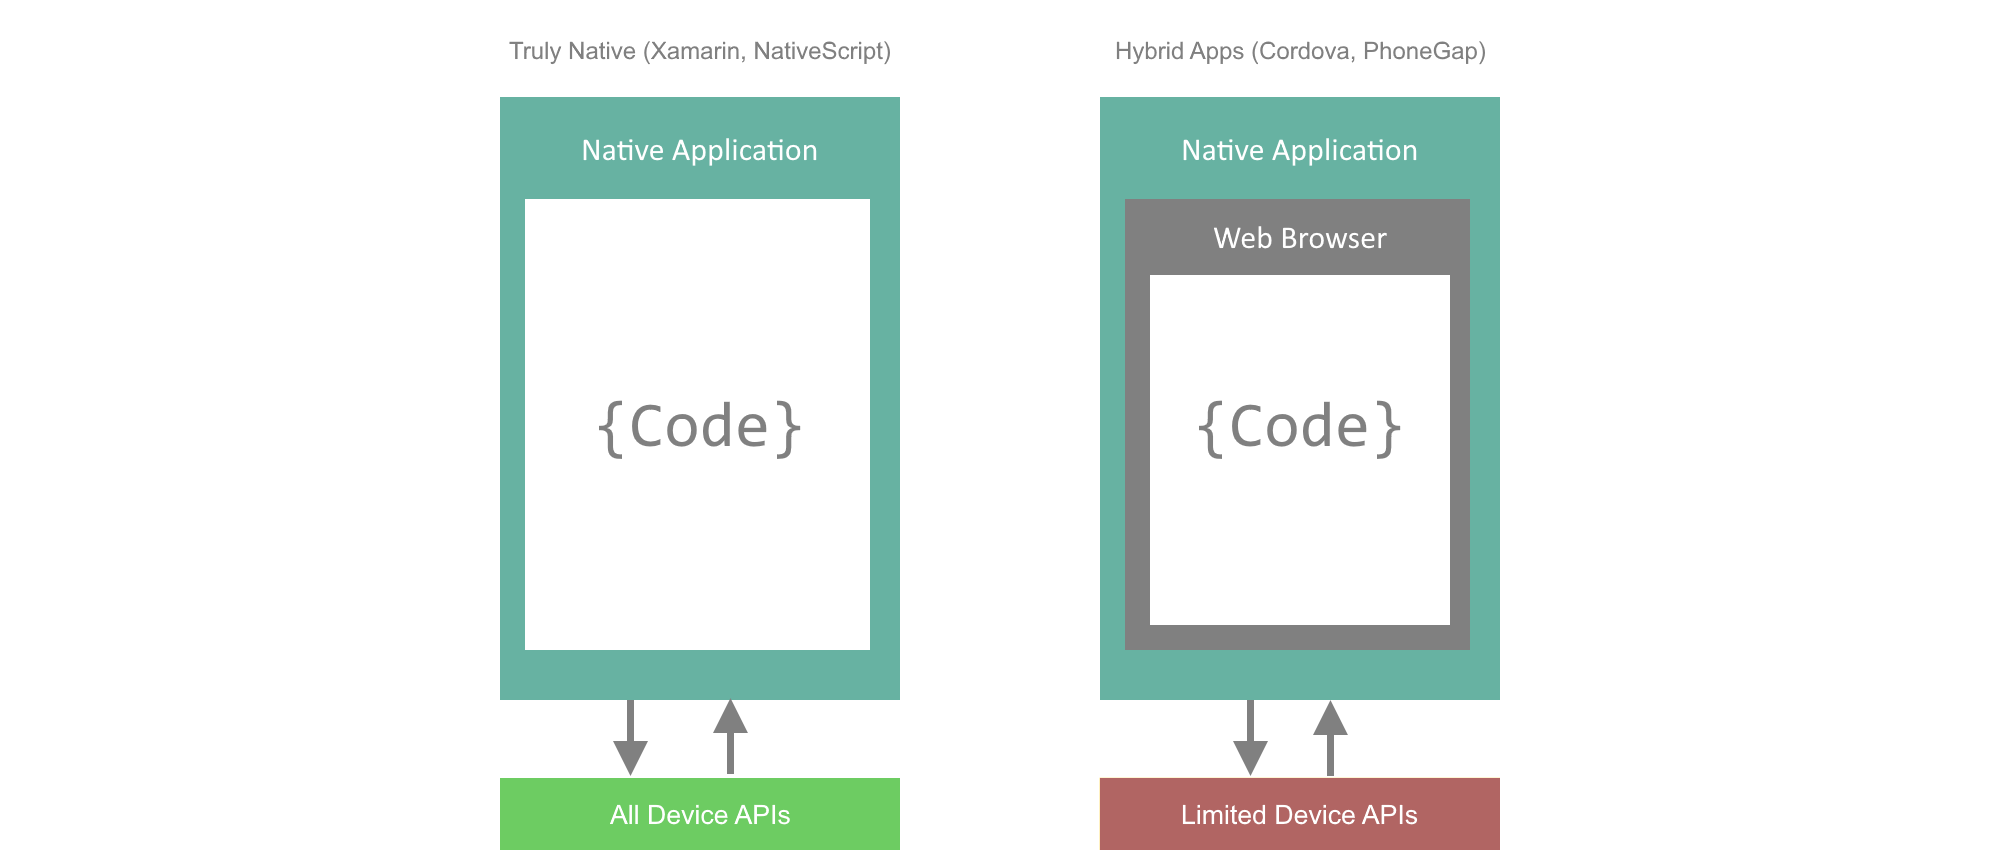
Hybrid apps, such as Cordova applications, combine characteristics of native app development and web development. These apps run in the devices’ built-in browsers, such as the Chrome WebView in Android. Thus, they abide by the rules of – and typically have the appearance of – a web application. In contrast to web apps, hypbrid apps can access some native capabilities of the device, though. These capabilities comprise e.g. the camera, geolocation and the accelerometer. In the end, however, it is basically a mobile website that appears as a native application.
Advantages:
Some advantages of hybrid development are:
- Code Reuse: Web Apps can be transformed into hybrid mobile apps and – to a certain degree – vice versa.
- Skill reuse: If you are familiar with JavaScript HTML and CSS you are able to get on track with hybrid solutions right away.
- Reduced development time and costs: The two points mentioned above result in fast results and thus reduce costs.
- Consistent UI: The look and feel of hybrid applications is the same among all platforms.
- Updates possible without republishing the app, as long as updates do not add or remove contents in the application package.
Disadvantages:
- Browser-like performance across platforms. This is especially an issue when it comes to heavy graphics and transitions. This is due to the fact that mobile browsers are limited in terms of access to the device’s resources.
- Inconsistencies in terms of behavior and performance across devices: Different WebViews and WebView versions may result in unexpected app behavior or appearance.
- Slow adoption of new platform versions: It may take up to a few months before a new mobile platform version becomes fully supported by e.g. Apache Cordova.
- Limited native API access. This is due to the fact that mobile browsers are uncoupled from native APIs in order to enhance battery performance and device security.
Truly Native Approach
With the truly native approach, as with NativeScript or Xamarin, there is no need for a web view to render the application. Like in the hybrid approach, there is a common application logic for all target operating systems. What is more is that truly native applications are characterised by the fact that all of the UI is composed of the native platform’s UI widgets. Moreover, all of the underlying device APIs are accessible.
Advantages:
Some advantages of the truly native approach are
- Native UI elements across platforms: The user is confronted with UI elements he or she is familiar with.
- Moreover, native elements are characterised by good performance.
- Full native API access.
Disadvantages
- Limited styling possibilities. The native UI components can only be styled to a certain degree.
- No code-reuse possible like it is with hybrid applications
- There is a certain learning curve in order to get to know the solution-specific technologies, such as NativeScript’s templating language or Xamarin’s UI framework Xamarin.Forms.
Xamarin vs NativeScript
In this section, we briefly go into the differences between Microsoft’s Xamarin and Progress’ NativeScript. Both generate truly native mobile applications. In doing so, Xamarin is written in C#, whereas NativeScript makes use of JavaScript, respectively TypeScript. The programming language is the major difference between NativeScript and Xamarin.
Xamarin provides two ways to define UIs for applications. With Native Xamarin, each targeted OS requires its own project. However, the projects share a common Business Logic, written in C#. The UI is defined separately for each OS. Xamarin.Forms, in contrast, allows for using the same UI definition (in XAML) for all OSs and thus for using only one project while targeting multiple platforms. Most styling is done via resources.
Concerning OS support, Xamarin supports mobile apps for iOS, Android, Windows Phone, Windows Uiversal and Windows 10. At the time of this article being written, NativeScript only supports iOS and Android.
NativeScript has zero-day support for new OSs. When a new OS is available, it is already supported by NativeScript, due to the fact that JavaScript is just executed on the native OS. With Xamarin, in contrast, developers have to wait for a release to support new OS versions. But only in theory. Until now, these releases have been available on day zero as well.
With NativeScript, changes in your code update the application in real-time without having to rebuild the application, whereas with Xamarin a rebuild is required more frequently.
Concerning speed, both, Xamarin and NativeScript have a performance of ~60fps. When it comes to working with larger data sets, NativeScript is faster than Xamarin.
When to use what
The question arises, when to use which approach to write a mobile application. The answer depends on a few factors, such as the needs of your app, the developers’ skills or the customer’s needs.
You would opt for NativeScript, if
- you prefer TypeScript (JavaScript, CoffeeScript,..) over C#
- you don’t have access to a Mac, as NativeScript allows for building iOS apps in the cloud, returning an installable .ipa file
- you prefer npm and the CLI tooling
- custom fonts and animations are important in your app
- you want to share/reuse code between web applications and mobile applications
You’d prefer Xamarin, if
- you prefer C# over TypeScript or JavaScript
- you prefer NuGet over npm
- you are into highly sophisticated IDEs like Visual Studio or Xamarin Studio
NativeScript
NativeScript – developed by Progress Telerik – is a framework which allows for writing truly native iOS and Android applications using platform-agnostic technologies such as JavaScript (and TypeScript), HTML and CSS. It was initially released in 2014. NativeScript supports Angular out of the box, but can also be written with VueJS, using the NativeScript-Vue Plugin.
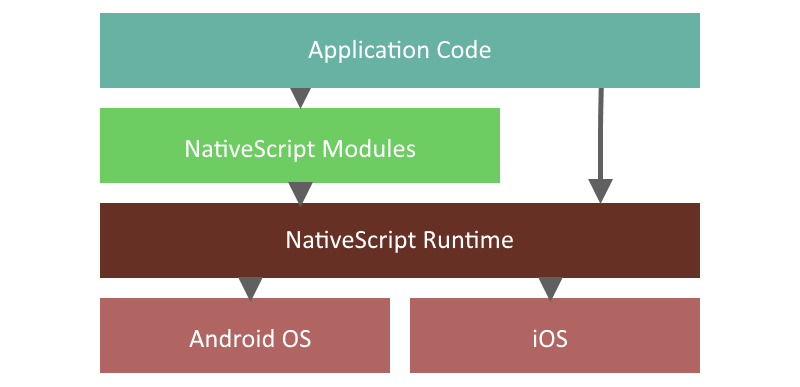
A NativeScript app is basically JavaScript, respectively TypeScript code which is executed at runtime within a JavaScript environment on top of the native mobile platform. NativeScript apps are characterized by native performance, user interface and access to device capabilities.
The most important parts of NativeScript are modules and runtimes. While modules expose the native device capabilities and UI components via JavaScript, runtimes compile and execute JavaScript code on the native platform.
With NativeScript and Angular, Angular modules, components and services can be defined and used just as in any other Angular application. In order to use the Angular libraries, like Router, Forms or Http as usual, NativeScript provides custom implementations for the mobile platforms.
IDE & Tools
According to the official NativeScript page, Visual Studio Code is preferred for developing NativeScript applications. However, The NativeScript CLI technically allows for development in any IDE. The CLI is also capable of building NativeScript apps and deploying them for installation on a mobile device.
User Interface
User-Interfaces are defined in xml. For reasons of framework compliance and IDE compatibility, html files are used to define the UI within. NativeScript parses the xml and creates the respective native UI elements on each platform.
Each html page has a TypeScript file of the same name. Via data binding, control events are passed to the corresponding TypeScript file.
In the opposite direction, NativeScript makes use of JavaScript to create, customize or interact with any UI element, as well as to call any native API.
Each UI is defined by a layout. The six available layouts are FlexboxLayout, AbsoluteLayout, DockLayout, GridLayout, StackLayout and WrapLayout. Within the layouts, several components, such as Button, Label, TextField,… can be used to define a UI.
Styling
NativeScript provides a subset of the standard CSS ruleset for styling applications. There are four ways to define styles for an application.
- app.css: Global styles that apply to the whole application
- app.android.css / app.ios.css: Platform-specific styles
- one css per template (…as with components in any other Angular application)
- inline styling
Note that there are no entities, such as px, em,…
Moreover, NativeScript ships with a default theme which describes styles and color schemes for all elements. The NativeScript Theme Builder allows for defining your own styles for all UI elements.
Plugins
At the time this article was written, there were ~660 plugins available for NativeScript. They comprise, e.g. camera support, map and navigation features or allow for accessing the device’s file system. The plugins can be found at the NativeScript Market.
Tutorial
In this tutorial it is demonstrated how to create a simple application which allows for listing, deleting and adding ToDo-Items which runs cross-platform on iOS and Android.
Prerequisites
In order to get started, make sure you have nodeJS, as well as its package manager npm installed on your machine. The other dependencies, such as the Android SDK will be installed during the installation of NativeScript.
Installation
Run npm install -g nativescript in order to install NativeScript globally on your system.
The NativeScript Quick Setup Page provides installation commands for each OS.
On a Windows system, e.g., you would run the following command in a console with administrator privileges.
@powershell -NoProfile -ExecutionPolicy Bypass -Command "iex ((new-object net.webclient).DownloadString('https://www.nativescript.org/setup/win'))"Finally, run tns doctor in order to see that everything worked fine. TNS is short for Telerik NativeScript.
Create a new App
To create a new NativeScript application named MyTodoApp, simply run tns create MyTodoApp --template nativescript-template-ng-tutorial. Due to the template parameter, a NativeScript application, fully wired-up with Angular and TypeScript is bootstrapped.
Run the App
To run the application, simply execute one of the commands tns run android or tns run ios, depending on the target environment. If no suitable device is connected to your system, an emulator is started. Note that emulating iOS applications requires Xcode, which is only available on macOS.
As long as the tns run command is running, it watches for changes in the code. When a change has been detected, the application is refreshed.
After the emulator has loaded and the application has been installed and started, you should see a simple default User Interface.
Tip: tns debug {android | ios --chrome} is basically the same as tns run, however, in addition a debug port is opened. The console shows a URL which allows for debugging the application with the Chrome DevTools when opened in Chrome.
Create the User Interface
Let’s start with the UI. In the app.component.ts we modify the @Component Decorator in order to reference a dedicated html file for the layout, as follows:
...
@Component({
  selector: "my-app",
  templateUrl: "app.component.html"
})
...
After creating the app.component.html, we define the layout for our main view.
<Page>
  <GridLayout rows="*, auto">
    <ScrollView row="0">
      <StackLayout orientation="vertical">
        <GridLayout *ngFor="let item of todoItems" columns="*, auto">
          <Label col="0" [text]="item.title" verticalAlignment="center"></Label>
          <Button col="1" (tap)="removeItem(item)" text="x"></Button>
        </GridLayout>
      </StackLayout>
    </ScrollView>
    <GridLayout row="1" rows="auto, auto">
      <TextField row="0" id="input"></TextField>
      <Button row="1" text="Add Item" (tap)="onAddButtonClicked()"></Button>
    </GridLayout>
  </GridLayout>
</Page>
The outermost Layout for our (only) Page is a GridLayout. The rows-attribute tells the layout to take as much space as possible for the first row and sufficient space for the second row in order to display its content.
The first row contains a scrollable list (or stack) of elements. These elements are bound to todoItems, an array of IToDoItems. Moreover, for each element we provide a Button which triggers a method called removeItem() when tapped.
The second row provides a TextField as well as a Button which listens for tap-Events and triggers the onAddButtonClicked()-method.
Implement Application Logic
The objects the application deals with, are ToDo-Items which have a title property. The IToDoItem interface is defined in a new file, app.models.contracts.ts:
export interface IToDoItem {
    title: string;
    ...
}
The major part of the application logic takes place in app.component.ts. First, we need some imports.
import { Page } from "ui/page";
import { TextField } from "ui/text-field";
import { IToDoItem } from "./models/contracts/app.models.contracts";
Apart from the IToDoItem, we also import Page and TextField. These imports are needed in order to interact with the respective UI components.
Page is injected into the AppComponent and is made privately accessible within the component. It allows for querying for UI elements, in this case a TextField, by id.
  private _textField: TextField;

  constructor(private page: Page) {

  }

  ngOnInit() {
    this._textField = <TextField> this.page.getViewById("input");
  }
The initial array of IToDoItems, the UI is bound to, is also declared and initialised in app.component.ts.
public todoItems: Array<ITodoItem> = [
    {
      title: "Buy Milk"
    },
    {
      title: "Clean flat"
    },
    {
      title: "Learn NativeScript"
    }
  ];
Finally, we define methods for adding and deleting IToDoItems from the data-Array.
public onAddButtonClicked(){
  if (this._textField.text){
    let newItem: IToDoItem = {
      title: this._textField.text
    };
    this.todoItems.push(newItem);
    this._textField.text = "";
  }
}

public removeItem(item: IToDoItem){
  let index = this.todoItems.indexOf(item);
  if (index >= 0){
    this.todoItems.splice(index, 1);
  }
}
When the onAddButtonClicked() function is called, the application checks whether the TextField contains a value. If so, a new IToDoItem is added to the data array with the value as title.
The removeItem(item: IToDoItem) function queries the data array for the given item. If the item exists, it is removed from the data array.
That’s it. We now have a simple application which allows for managing a list of ToDo-items, written with NativeScript and Angular, that can be deployed on both, Android and iOS devices. A logical next step would be to persist the data, either online with the HTTP Module, or locally on the device, for example via SQLite.
Sources
- https://www.nativescript.org
- https://www.nativescript.org/blog/nativescript-and-xamarin
- https://docs.nativescript.org/start/introduction
- https://docs.nativescript.org/ui/styling#supported-css-properties
- https://www.informatik-aktuell.de/entwicklung/programmiersprachen/nativescript-angular-2-native-apps-in-javascript.html

Dein Kommentar
An Diskussion beteiligen?Hinterlasse uns Deinen Kommentar!